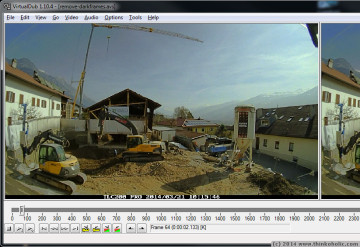
 the problem: i have a long-term time lapse videos that contains not just daylight footage, but also very dark footage captured during night. the camera used – the brinno tlc200 pro – actually has a setting to stop recording at night, but this only takes effect after several dark frames, resulting in a video that lacks fluency.
manual removal of these night frames is only an option for videos covering a few days, but not for long-term footage.
there is a way, however, to drop night frames automatically using free, open-source software. here’s how:
how to automatically drop dark frames from a time-lapse video
1. download and install avisynth.
2. download and install virtualdub.
(at the time of writing this, only 32-bit virtualdub is compatible with avisynth, so choose the 32-bit file.)
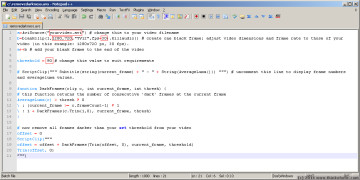 3. copy the following code into a text editor, and save as “removedarkness.avs” (encoding: ANSI).
adjust lines 1 (just the video file name if it’s in the same folder as the .avs, otherwise include the directory path) and 2 (video dimensions and frame rate for blank frame), and 5 (your brightness threshold). save file.
a=AviSource("yourvideo.avi") # change this to your video filename

b=blankclip(1,1280,720,"YV12",fps=30).killaudio() # create one black frame; adjust video dimensions and frame rate to those of your video (in this example: 1280x720 px, 30 fps).

a++b # add your blank frame to the end of the video


threshold = 90 # change this value to suit requirements


# ScriptClip(""" Subtitle(string(current_frame) + " - " + String(AverageLuma())) """) # uncomment this line to display frame numbers and averageluma values.


function DarkFrames(clip c, int current_frame, int thresh) {

# this function returns the number of consecutive 'dark' frames at the current frame

AverageLuma(c) > thresh ? 0

\ : (current_frame >= c.frameCount-1) ? 1

\ : 1 + DarkFrames(c.Trim(1,0), current_frame, thresh)

}


# now remove all frames darker than your set threshold from your video

offset = 0

ScriptClip("""

offset = offset + DarkFrames(Trim(offset, 0), current_frame, threshold)

Trim(offset, 0)

""")
4. drag&drop the removedarkness.avs into virtualdub and hit “play” to get a live preview. the video may stutter at this point, but your exported video will play fluently.
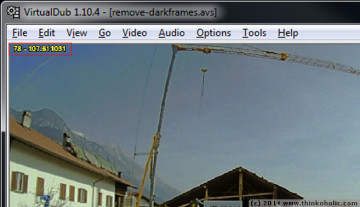
- 4a. to optimize your threshold, remove the first “#” from line 7 (“# ScriptClip…”), save, and reopen the .avs file with virtualdub. in the top left corner, the preview will now show the frame number and a value for the overall brightness of that frame (average luma).
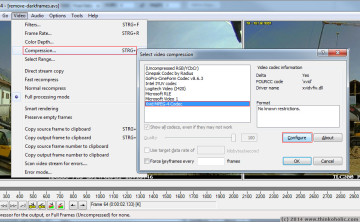
5. check your compression settings under “video” > “compression”. in case of doubt, use the settings from step 5c.
- 5a. if step 5 results in an error message saying “This AVI file doesn’t have a movie data block (movi)!” (e.g. with brinno footage), open your original .avi file in virtual dub.
5b. from the main menu, open “video” > “compression”.
5c. choose the xvid mpeg-4 codec (download and install first, if you don’t have it yet). click “configure”, open “calc” near the “target quantizer” and enter a the file size of your original video (in KB) to make sure the video quality doesn’t suffer too much.
5d. enter the correct video duration and frame rate (fps) into the fields below.
5e. confirm these settings, close the compression window, and return to the main virtualdub window.
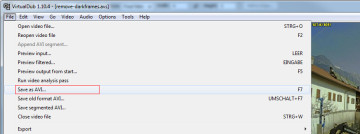
5f. choose “file” > “save as avi” to export an avisynth-compatible version of your video.
5g. adjust the video source in line 1 of your removedarkness.avs file, and go to step 4.
6. choose “file” > “save as avi” to export your final video.
note: since avisynth cannot change the video length, it will repeat the last (blank) frame in the video for every dark frame it removes. you can remove this end section using virtualdub or the video editing software of your choice.
the code above is a modification based on Gavino’s avisynth code.
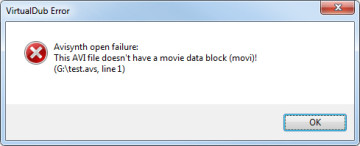

I’m getting the error message “This AVI file doesn’t have a movie data block (movi)!”
upon immediately dragging the script into VirtualDub. It is reporting that it is line 1, so it’s the source file. It’s the same file that my TLC-200 produced fresh off the SD card. Any ideas?
hi alex,
the only thing i can think of: have you double-checked that the script uses the correct file name (incl. upper/lower case) and path?
if those are correct, try dragging the avi file into virtualdub directly to make sure the file is not corrupted.